The Center for Conservation Biology presents our Mapping Portal as a complimentary service to the conservation community. See below for answers to common questions and tips for proper usage. If you do not find the answer to your question here, you can contact the Operations Manager, Marie Pitts, at mlpitts@wm.edu or 757-221-7503.
The image below shows the basic parts of the Mapping Portal:
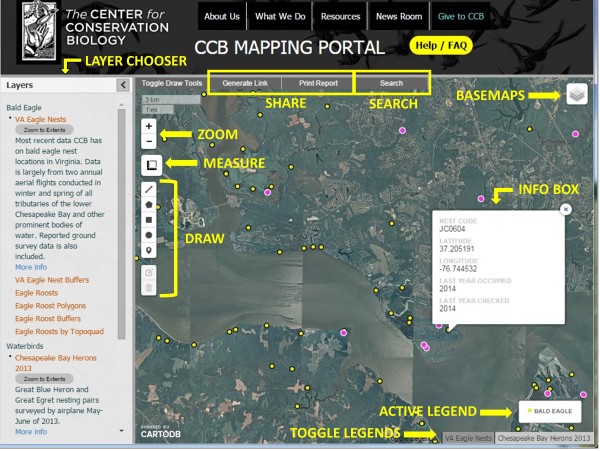
These are the main parts to the CCB Mapping Portal.
Click on a question to learn more:
- How do I view data?
- How do I change the basemap?
- How do I search for a specific place or set of coordinates?
- How do I measure distance/area?
- How do I share my map with others (links & reports)?
- How do I draw my own shapes and points?
- Why can’t I see the map or any data?
- How can I get a copy of this data?
- Additional ways to save map as a PDF
Q: How do I view data?
Layer Chooser: The Layer Chooser is on the left of the screen. Click on the data layer to read a short explanation and view the data on the map. The “Zoom to Extent” button will zoom the screen to include all of the data for that layer. Clicking on “More info” will open a link to the dataset’s Project Page. There may be sub-layers that are displayed that allow you to filter for a subset of the data (ex. specific species). Multiple layers can be viewed at the same time, except for the colonial waterbird layers.Click on the little gray arrow in the upper right corner to collapse/expand the layer chooser. Click on any data point to open an Info Box that contains specific information for that data point.
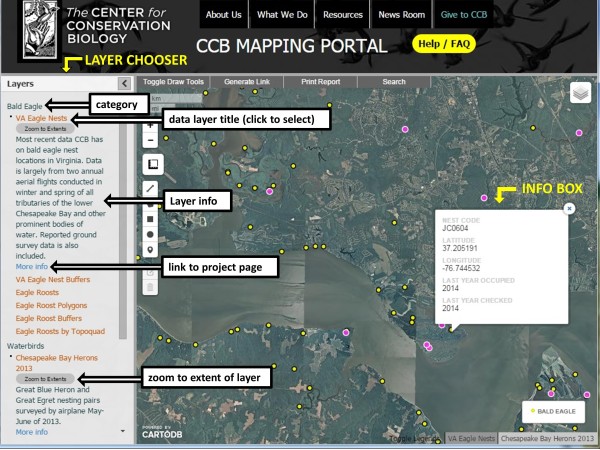
Use the Layer Chooser on the left to select data. Clicking on data points will open an Info Box.
Layer Legends: On the bottom-right of the map, you can toggle between the legends of active layers. Only one active legend is shown at a time.

You can toggle between active legends by clicking on the layer title in the bottom-right of the map.
Q: How do I change the basemap?
Basemap button: Hover over the button in the upper right-hand corner to toggle between different basemaps.

Press this button in the upper-right of the map to toggle between different basemaps.
Q: How do I search for a specific place or set of coordinates?
Search Tool: Click on the “Search” along the top of the map. Enter a specific latitude and longitude in decimal degrees, or use the “Address” area to search for addresses, counties, water bodies, etc. Hit Enter, and a blue marker will appear at your searched location. If you drag the blue marker around with your mouse, the coordinates in the search box will change accordingly. Click “Clear” in the bottom of the search box to remove the blue marker and start a new search.
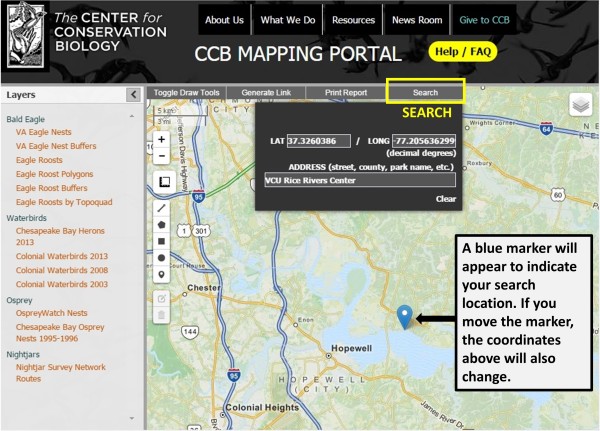
Use the Search Tool to find locations via addresses or coordinates.
Q: How do I measure distance/area?
Measuring Tool: Hover over the measurement button and select “Create a new measurement.” Click on two places on the map to measure the distance in between the points, or add three or more points to measure both perimeter and area of whatever shape you draw. Double-click to finish your measurement. A results window will give you the perimeter length, area, start/end coordinates (if just a line), and the option of revealing the coordinates of the center of the shape. To remove your measurement, click on the shape and select “Delete.”
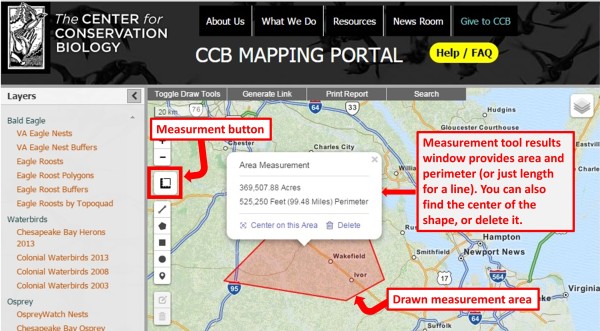
The measuring tool provides line distance and coordinates, as well as the perimeter and area of polygon shapes.
Q: How do I share my map with others (links & printing reports)?
Generate Link: The Generate Link button saves the current map state to a URL that you can bookmark and revisit later or share with others. After clicking on the Generate Link button, the address bar will automatically be updated and is ready to be copied or bookmarked.
Print Report: Use the Print Report button to generate a one page PDF report based on the current map state. The report will include the current map view, the current active legend, the names of all active layers, the coordinates of the map center, the date the report was generated, and a link to map at the time the report was generated.
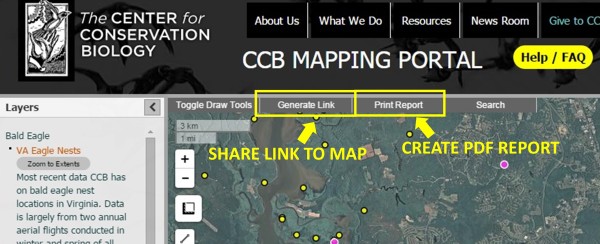
Use the “Generate Link” button to create a shareable link to the current map in the URL bar. Use the “Print Report”button to create a PDF report of the current map.
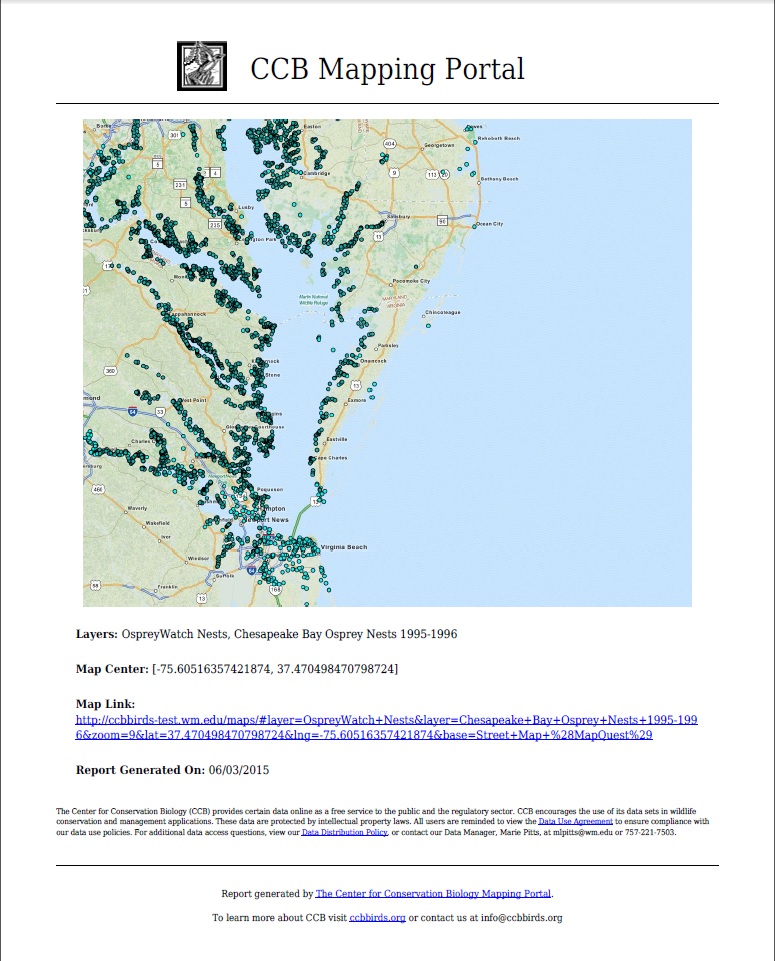
Example of the Print Report output. Click to enlarge.
*Note that user-drawn shapes and points are not copied to shared map links or reports.
Q: How do I draw my own shapes and points?
Draw Tools: Below the measurements tool are 5 buttons to create a line, polygon, square, circle, or place a marker. Each of these can then be edited or deleted by using the two buttons at the bottom of the Draw Tools bar.
To edit: Click on the “edit” button and move drawing vertices (or markers) as desired. Click “Save”.
To delete: Click on the “delete” button. Next, click on the drawing or marker that you want to delete. Click “Save”.
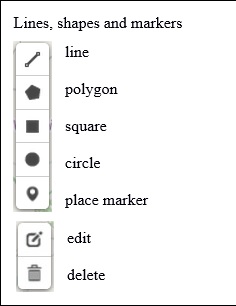
You can add your own lines, shapes, and points, by using the draw tools on the left of the map.
Q: Why can’t I see the map or any data?
You may be using an outdated browser. You may have trouble viewing the Mapping Portal properly if you are using Windows XP or Internet Explorer 8. We strive to keep Mapping Portal compatible with updated browsers, and encourage you to download the most recent versions of Chrome, Internet Explorer, or Firefox.
Q: Additional ways to save map as a PDF
For Chrome, click the options button on the upper right, click “Print…”, and under the “Destination” click “Change…” and “Save as PDF.”
For Firefox, click the Options arrow in the upper right, and click “Convert Webpage to Adobe PDF…”
For Internet Explorer, you need to have the Adobe PDF toolbar installed.